

Introduction to React Native app development
As the demand for mobile applications continues to rise, developers are constantly seeking efficient ways to build high-quality apps quickly. One framework that has gained significant popularity in recent years is React Native. In this article, I will guide you through the process of creating a winning React Native app, from concept to profit.
Understanding the concept of React Native
React Native is an open-source framework developed by Facebook that allows you to build mobile apps using JavaScript. Unlike traditional app development, where you need to write separate code for iOS and Android platforms, React Native enables you to write code once and use it across multiple platforms. This not only saves time but also ensures a consistent user experience across devices.
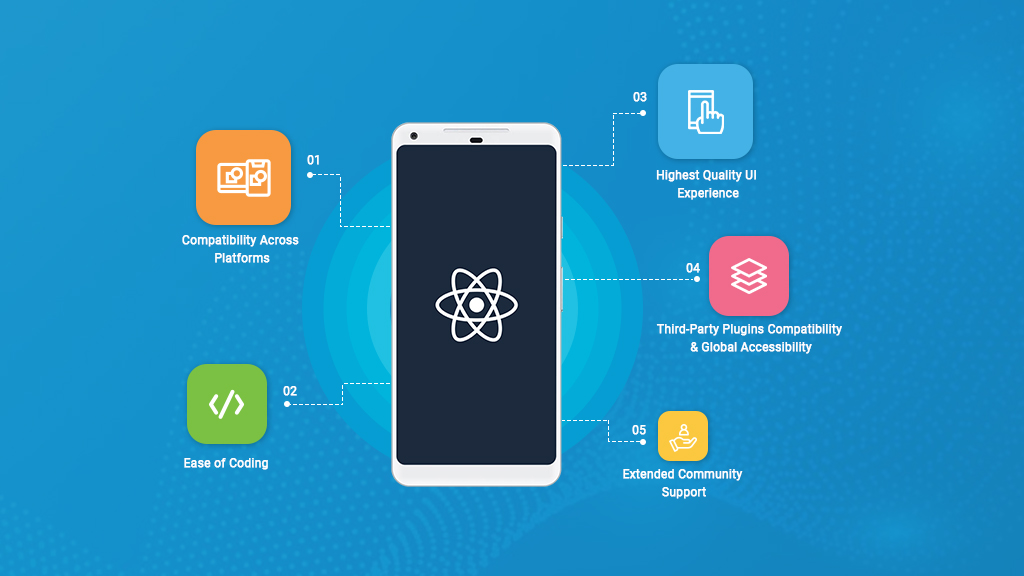
Benefits of using React Native for app development
There are several benefits of using React Native for app development. Firstly, it offers a faster development cycle as you can reuse components and code. This means that you can develop your app more quickly and efficiently, saving both time and resources. Secondly, React Native allows for hot reloading, which means that you can instantly see the changes you make to your code without having to restart the app. This makes the development process more interactive and iterative.
Another advantage of React Native is its strong performance. Its user interface is responsive and fluid since it makes use of native components. Additionally, React Native apps are highly scalable, allowing you to easily add new features and functionalities as your app grows. Finally, React Native has a large and active community, providing extensive support and resources. This means that you can easily find help and guidance whenever you encounter an issue during development.
Key components of a React Native app
Before diving into the development process, it is essential to understand the key components of a React Native app. The most important component is the “View,” which is used to create the user interface of the app. Views can be nested within each other to create complex layouts. Another crucial component is the “Text,” which is used to display text on the screen. React Native also provides components for handling user input, such as “TextInput” and “Button.”
In addition to these basic components, React Native offers a wide range of pre-built components that can be used to create a polished user interface. These include navigation components, image components, and animation components. By leveraging these components, you can save time and effort in the design process and focus more on the functionality of your app.
Setting up the development environment
To start developing a React Native app, you need to set up your development environment. The first step is to install Node.js, which is required for running JavaScript on the server. Once Node.js is installed, you can use the Node Package Manager (NPM) to install the React Native CLI (Command Line Interface). The CLI allows you to create, build, and run React Native projects.
After installing the React Native CLI, you can create a new project by running the command “npx react-native init [project-name].” This will create a new directory with the specified project name and set up the initial project structure. Once the project is created, you can navigate to the project directory and start the development server by running the command “npx react-native start.”
Designing the user interface
The user interface is a crucial aspect of any app, as it determines how users interact with your app. In React Native, you can design the user interface using a combination of JavaScript and XML-like syntax called JSX. JSX allows you to write code that closely resembles HTML, making it easy to create and manipulate UI components.
To design the user interface, you need to define the layout of your app using the available components. You can use the “View” component to create containers and nested components to structure the layout. Additionally, you can use the “Text” component to display text and the “Image” component to display images. React Native also provides a range of styling options, allowing you to customize the appearance of your components.
Writing code for React Native app functionality
Once the user interface is designed, you need to write code to add functionality to your React Native app. This involves handling user input, making API requests, and updating the UI based on the app’s state. React Native provides a powerful state management system that allows you to manage and update the app’s state efficiently.
To handle user input, you can use the “TextInput” component, which allows users to enter text. You can then capture this input and perform validation or make API requests based on the user’s input. React Native also provides a range of event handlers, such as “onPress” for buttons and “onChangeText” for text inputs, which allow you to respond to user actions.
To make API requests, you can use the “fetch” function, which is built into JavaScript. This allows you to send HTTP requests to a server and receive responses. You can then use the response data to update the app’s state and display the relevant information to the user.
Testing and debugging the React Native app
Testing and debugging are essential steps in the app development process to ensure that your app works as expected. React Native provides several tools and libraries that can help you with testing and debugging.
One such tool is the React Native Debugger, which is a standalone app that allows you to inspect and debug your React Native app. It provides a range of useful features, such as viewing the component hierarchy, inspecting the app’s state, and monitoring network requests. Another useful tool is the React Native Testing Library, which provides a set of utilities for testing React Native components. It allows you to write tests that simulate user interactions and verify that the app behaves correctly.
Deploying the React Native app to different platforms
Once your React Native app is developed and tested, it’s time to deploy it to different platforms. React Native allows you to build apps for both iOS and Android platforms using the same codebase. To deploy your app to iOS, you need to have a Mac computer with Xcode installed. Xcode is the development environment for iOS apps and allows you to build, test, and submit your app to the App Store.
To deploy your app to Android, you need to have Android Studio installed on your computer. Android Studio is the development environment for Android apps and provides similar functionality to Xcode. Once your app is built, you can generate an APK file, which is the installation file for Android apps. This file can then be distributed to users or uploaded to the Google Play Store.
Monetizing your React Native app
Now that your React Native app is developed and deployed, you may be wondering how to monetize it. There are several monetization strategies you can consider, depending on the nature of your app and your target audience.
One common strategy is to offer your app as a paid download. This means that users have to pay a one-time fee to download and use your app. Another strategy is to offer in-app purchases, where users can buy additional features or content within your app. This can be a lucrative strategy, as it allows you to generate ongoing revenue from your app.
You can also consider displaying ads in your app to generate revenue. There are several ad networks, such as Google AdMob and Facebook Audience Network, that allow you to display ads within your app and earn money based on user interactions with the ads. Finally, you can explore partnerships or sponsorships with other companies that are relevant to your app’s target audience. This can involve promoting their products or services within your app in exchange for a fee.
Promoting and marketing your React Native app
Once your app is monetized, it’s important to promote and market it to reach a wider audience. There are several strategies you can use to promote your React Native app.
One effective strategy is to optimize your app’s visibility in the app stores. This involves optimizing your app’s metadata, such as the title, description, and keywords, to improve its search ranking. You can also encourage users to leave positive reviews and ratings, as this can boost your app’s credibility and visibility.
Another strategy is to leverage social media platforms to promote your app. You can create dedicated social media accounts for your app and regularly post updates, sneak peeks, and promotional content. Additionally, you can run targeted ads on social media platforms to reach your app’s target audience.
Finally, you can consider partnering with influencers or bloggers in your app’s niche to promote your app. This can involve providing them with free access to your app or offering them an affiliate commission for every user they refer to your app. Influencers and bloggers have a dedicated following, and their endorsement can significantly boost your app’s visibility and credibility.
Conclusion and final thoughts
Creating a winning React Native app involves understanding the concept of React Native, leveraging its benefits, and utilizing its key components. It also requires setting up the development environment, designing the user interface, writing code for app functionality, testing and debugging, deploying to different platforms, monetizing, and promoting the app. By following these steps and implementing effective strategies, you can create a successful React Native app that not only meets the needs of your target audience but also generates profit.
In conclusion, React Native provides a powerful framework for app development, allowing you to build high-quality apps quickly and efficiently. With its strong performance, scalability, and extensive community support, React Native is an excellent choice for creating winning mobile apps. So, start exploring the world of React Native and turn your app ideas into profitable ventures.